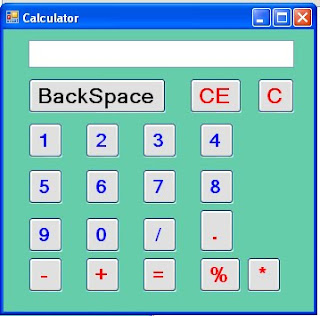
In the next few pages, you're going to create a Calculator. It won't be a very sophisticated calculator, and the only thing it can do is add up. What the project will give you is more confidence in using variables, and shifting values from one control to another. So create a new project, call it Calculator, and let's get started. Designing the Form
Let's design the form first. What does a calculator need? Well numbers, for one. A display area for the result. A plus sign button, an equals sign button, and a clear the display button. Here's how our calculator is going to work. We'll have 10 button for the numbers 0 to 9. When a button is clicked its value will be transferred to a display area, which will be a Textbox. Once a number is transferred to the Textbox we can click on the Plus button. Then we need to click back on another number. To get the answer, we'll click on the equals sign. To clear the display, we'll have a Clear button.
If you haven't already, create a new project. Save it as Calculator. To your new form, first add ten Buttons (You can add one, then copy and paste the rest). The Buttons should have the following Properties:
Name: btn Plus a Number (btnOne, btnTwo, btnThree, etc)
Text: A number from 0 to 9. A different one for each button, obviously
Next, add a Textbox. Set the following properties for the Textbox:
Textbox Name: txtDisplayFont: MS Sans Serif, Bold, 14Text: Erase the default, Textbox1, and leave it blank
Three more Command buttons need to be added
Plus Button Name cmdPlusFont MS Sans Serif, Bold, 14Text +
Equals Button Name cmdEqualsFont MS Sans Serif, Bold, 14Text =
Clear ButtonName cmdClearFont MS Sans Serif, Bold, 14Text Clear
When your form design is finished, it might look something like this
