Sunday, December 19, 2010
Control Structure in VB.NET
If Then Statement
If Then Else Statement
If Then Else If Statement
Select Case Statement
Looping Statement in VB.NET
For Next Loop
While ..End While
Do while Loop
Conditional Statements
Different type of Conditional Statements are there. They are
1. If…Then Statement
2. If…Then…Else Statement
3. If…Then…Elseif Statement
4. Select Case Statement
If Then Statement
The if-then statement is the most basic of all the control flow statements. It tells your program to execute a certain section of code only if a particular test evaluates to true.
Syntax:
If <> Then
Block of the statement
End If
The following example we have declared Integer type variable a,b and assigning the value for the variable a=10, b=10. Now the condition is true MsgBox(“A is Equal to B”) will be executed and display A is Equal to B.
Example1
Dim a, b As Integer
a=10
b=10
If a = b Then
MsgBox("A is Equal to B" )
End If
The following example we have declared Integer type variable a,b and assigning the value for the variable a=10, b=5. Now the condition is False.nothing will be executed.
Example2
Dim a, b As Integer
a=10
b=5
If a = b Then
MsgBox("A is Equal to B" )
If Then Else Statement
The if-then-else statement provides a secondary path of execution when an "if" clause evaluates to false, the ELSE part will be executed.
Syntax:
If <> Then
Block of the statement1
Else
Block of the statement2
End If
If the condition is TRUE block of the statement1 will be executed. If the condition is evaluated FALSE block of the statement2 will be executed.
Example
Private Sub Button2_Click(ByVal sender As System.Object, ByVal e As System.EventArgs) Handles Button2.Click
Dim a As String
a = InputBox("Enter text")
If a = "" Then
Me.Close()
Else
MsgBox("Welcome " & a)
End If
End Sub
End Class
If Then Else If Statement
Syntax:
If
Block of the statement1
Else If
Block of the statement2
Else If
Block of the statement3
Else
Block of the statement4
End If
Example
Private Sub Button2_Click(ByVal sender As System.Object, ByVal e As System.EventArgs) Handles Button2.Click
Dim a, b, c As Integer
a = InputBox("Enter the value for A")
b = InputBox("Enter the value for B")
c = InputBox("Enter the value for C")
If a = b Then
MsgBox("A is Equal to B" )
ElseIf a > b Then
MsgBox("A is greater then B" )
ElseIf a <>
Select Case Statement
Syntax:
Case value1 Block of one or more statements
End Select
Private Sub Button1_Click(ByVal sender As System.Object, ByVal e As System.EventArgs) Handles Button1.Click
Dim Grade As String
Grade = InputBox("Enter Grade")
Select Case Grade
Case "A"
Label1.Text = "High Distinction"
Case "B"
Label1.Text = "Credit"
Case "C"
Label1.Text = "Pass"
Case Else
Label1.Text = "Fail"
End Select
End Sub
Example 2
Private Sub Button1_Click(ByVal sender As System.Object, ByVal e As System.EventArgs) Handles Button1.Click
Dim mark As Integer
mark = InputBox("Enter the Marks")
Select Case mark
Case Is >= 85
Label1.Text = "Excellence"
Case Is >= 70
Label1.Text = "Good"
Case Is >= 60
Label1.Text = "Above Average"
Case Is >= 50
Label1.Text = "Average"
Case Else
Label1.Text = "Need to work harder"
End Select
End Sub
Example 3
Private Sub Button1_Click(ByVal sender As System.Object, ByVal e As System.EventArgs) Handles Button1.Click
Dim mark As Integer
mark = InputBox("Enter the Marks")
Select Case mark
Case 0 To 49
Label1.Text = "Need to work harder"
Case 50 To 59
Label1.Text = "Average"
Case 60 To 69
Label1.Text = "Above Average"
Case 70 To 84
Label1.Text = "Good"
Case Else
Label1.Text = "Excellence"
End Select
End Sub
End Class
Looping Statement in VB.NET
The execution of a particular block of statement repetitively. The repeation occurs untill the condition is evaluated to TRUE or FALSE.
The loops is supported by VB.NET are.
For Next Loop
For Countervariable=[starting Value] To [ending Value] [Step]
[loop of the Body]
Next [countervariable]
countervariable : The counter for the loop to repeat the steps.
startingValue : The starting value assign to counter variable .
endingValue : When the counter variable reach end value the Loop will stop .
loop of the Body : The source code between loop body
Lets take a simple real time example , If you want to show a messagebox 5 times and each time you want to see how many times the message box shows.
Dim a,b,i As Integer
1. a=1
2. b = 5
3. For i = a To b
4. MsgBox(“My God”)
5. Next i
Line 1: Loop starts value from 1
Line 2: Loop will end when it reach 5
Line 3: Assign the starting value to” i” and inform to stop when the “I” reach endingValalue(5)
Line 4: Execute the loop of the body
Line 5: Taking next step , if the counter not reach the endingValalue
Public Class Form1
Private Sub Button1_Click(ByVal sender As System.Object,
ByVal e As System.EventArgs) Handles Button1.Click
Dim i As Integer
Dim a As Integer
Dim b As Integer
a = 1
b = 5
For i = a To b
MsgBox("Message Box Shows " & var & " Times ")
Next i
End Sub
End Class
When you execute this program , It will show messagebox five time and each time it shows the counter value.
If you want to Exit from FOR Loop even before completing the loop Visual Basic.NET provides a keyword Exit to use within the loop of the body.
Syntax:
For Countervariable=[starting Value] To [ending Value] [Step]
[ loop of the Body ]
Condition
[ Exit For ]
Next [ countervariable ]
Example for EXIT For Loop
Public Class Form1
Private Sub Button1_Click(ByVal sender As System.Object,
ByVal e As System.EventArgs) Handles Button1.Click
Dim i As Integer
Dim a As Integer
Dim b As Integer
a = 1
b = 5
For i = a To b
MsgBox("Message Box Shows " & var & " Times ")
If i=3 Then
Exit For
End If
Next i
End Sub
End Class
While ..End While
While .. End While Loop execute the code until it meets the specified condition.
While [condition]
Condition : The condition set by the user
5. End While
Line 1: Counter start from 1
Line 2: While loop checking the counter if it is less than or equal to 10
Line 3: Each time the Loop execute the message and show
Line 4: Counter increment the value of 1 each time the loop execute
Line 5: End of the While End While Loop body
Example
Public Class Form1
Private Sub Button1_Click(ByVal sender As System.Object,
ByVal e As System.EventArgs) Handles Button1.Click
Dim counter As Integer
Counter=1
While(counter<=6) MsgBox(“Now Counter Value is :” & counter) Counter=counter+1 End While End Sub End Class
Do while Loop
Previous Next
The Loop Started with Do While Keyword. While loop to execute a block of code until a condition becomes False.
Syntax:
Do [ While Until ]
Statements
Exit Do
Statements
Loop
The Do While Statement will execute until the condition is False.
The Do Until Statement will execute until the condition is True.
Syntax:
Do
Statements
Exit Do
Statements
Loop [ While Until ]
Example for Do While
Dim a As Integer
a=1
do while a<=6 MsgBox(“ Now A value is” & a) a=a+1 Loop Example for Do Until
Dim a As Integer
a=1
do until a>=6
MsgBox(“ Now A value is” & a)
a=a+1
Loop
The above example Do while Loop will execute over and over until the variable “a” becomes greater than the value 7.
Sometimes, you may want to exit a While loop before the condition is False. We can exit a loop at any time by using the Exit Do Keyword.
Example
Dim a As Integer
a=1
do while a<=6 MsgBox(“ Now A value is” & a) a=a+1 if a=3 then Exit Do End If Loop
Monday, December 13, 2010
Tuesday, October 5, 2010
Operators in VB.NET
Page : 1 2 3 4 5 6 7 8 9 10 11 12 13 14
Operators Comes with many built-in operators that allow us to manipulate data. An operator performs a function on one or more operands.
For example, we add two variables with the "+" addition operator and store the result in a third variable with the "=" assignment operator like this: a + b = c. The two variables (a ,b) are called operands.
There are different types of operators in VB.NET
Arithmetic Operators
Concatenation Operators
Comparison Operators
Logical / Bitwise Operators
Arithmetic Operators
Page : 1 2 3 4 5 6 7 8 9 10 11 12 13 14

Example for Arithmetic Operators
Dim a,b,c As Integer
a=10
b=7
Addition - c = a + b 17
Multiplication - c = a * b 70
Division - c = a / b 1.42857142
Modulus - c = a Mod b 3
Subtraction - c = a - b 3
Exponentation - c = a ^ b 10000000
Integer Division - c = a \ b 1
Concatenation Operators
Page : 1 2 3 4 5 6 7 8 9 10 11 12 13 14
There are two concatenation operators, + (Plus) and & (Ampersand)

Example
Dim str As String
Dim s1,s2 As String
S1= “MCA”
S2= “Department”
Str=s1+s2
Result will be : MCA Department
Str=s1&s2
Result will be: MCA Department
Comparison Operators
A comparison operator is used to compare two operands and returns a logical value based on whether the comparison is true or not.

Example
Dim a,b,c As Integer
Private Sub Button1_Click(ByVal sender As System.Object, ByVal e As System.EventArgs) Handles Button1.Click
a = 10
b = 7
If a = b Then
MsgBox("A is equal to B")
ElseIf a <> b Then
MsgBox("A Not equal to B")
ElseIf a > b Then
MsgBox("A is Grager than B")
ElseIf a <>= b Then
MsgBox("A is Grager than or equal to B")
ElseIf a <= b Then MsgBox("A is Less than or equal to B") End If End Sub Output will be display in MessageBox

Logical and Bitwise Operators
The logical operators compare Boolean expressions and return a Boolean result. In short, logical operators are expressions which return a true or false result over a conditional expression.
The table is given below.

Example
n = Not 10 > 7
MsgBox("N is True")
n = Not 10 <>
Example for Operators
Form Design
Place the 3 Lebel, 3 TextBox and 7 Button in your Form using ToolBox
Change the Properties of the Label to the following
Text: Number1
Text: Number2
Text: Result
Change the Properties of the Textbox to the following
Name: TxtNumber1Text: just delete the default Textbox1, and leave the textbox blank
Name: TxtNumber2Text: just delete the default Textbox2, and leave the textbox blank
Name: TxtResultText: just delete the default Textbox3, and leave the textbox blank
Change the Properties of the Button to the following:
Name: AddButtText: just delete the default Button1, and Type Add
Name: AddSubText: just delete the default Button2, and Type Sub
Name: MulButtText: just delete the default Button3, and Type Mul
Name: DivButtText: just delete the default Button4, and Type Div
Name: IntDivButtText: just delete the default Button5, and Type IntDivision
Name: ModButtText: just delete the default Button6, and Type Mod
Your Form should look like this:

Source Code
Private Sub AddButt_Click(ByVal sender As System.Object, ByVal e As System.EventArgs) Handles AddButt.Click
TxtResult.Text = Val(TxtNumber1.Text) + Val(TxtNumber2.Text)
End Sub
Private Sub MulButt_Click(ByVal sender As System.Object, ByVal e As System.EventArgs) Handles MulButt.Click
TxtResult.Text = Val(TxtNumber1.Text) * Val(TxtNumber2.Text)
End Sub
Private Sub DivButt_Click(ByVal sender As System.Object, ByVal e As System.EventArgs) Handles DivButt.Click
TxtResult.Text = Val(TxtNumber1.Text) / Val(TxtNumber2.Text)
End Sub
Private Sub ModButt_Click(ByVal sender As System.Object, ByVal e As System.EventArgs) Handles ModButt.Click
TxtResult.Text = Val(TxtNumber1.Text) Mod Val(TxtNumber2.Text)
End Sub1
Private Sub SubButt_Click(ByVal sender As System.Object, ByVal e As System.EventArgs) Handles SubButt.Click
TxtResult.Text = Val(TxtNumber1.Text) - Val(TxtNumber2.Text)
End Sub
Private Sub ExpoButt_Click(ByVal sender As System.Object, ByVal e As System.EventArgs) Handles ExpoButt.Click
TxtResult.Text = Val(TxtNumber1.Text) ^ Val(TxtNumber2.Text)
End Sub
Private Sub IntDivButt_Click(ByVal sender As System.Object, ByVal e As System.EventArgs) Handles IntDivButt.Click
TxtResult.Text = Val(TxtNumber1.Text) \ Val(TxtNumber2.Text)
End Sub
End Class
Output

Monday, October 4, 2010
Data Types in VB .NET
Page : 1 2 3 4 5 6 7 8 9 10 11 12 13 14
The Data types available in VB .NET, their size, type, description are summarized in the table below.
Data Type are

Numeric Data
Integer and Long are the most commonly used data types. The conventional Integer found in C, C++ and java is a 16-bit data type but the Integer in VB.Net is now 32 bit, while Long is now 64 bit.
Decimal Data
VB.Net has a 128-bit Decimal data type, which provides support for very large values that can be scaled by powers of 10.
It is divided into 2 parts
96-bit integer for storing the Integer part
32-bit integer for storing the decimal part
Decimal can have values anywhere between 0 to 28 digits to the right of the decimal point. More the digits to the right, higher is the precision we get.
Character Data
Char contains Unicode value ranging from 0-65535 and consumes 2 bytes of space. It directly supports international character sets. The Char data type is intended for use in manipulating single character values or for creating arrays of character values.
Strings
String data type comes form the System.String Class. Any attempt to change the value of the String. Results in a new String being created to store the changed value, while the original is destroyed.
Objects
VB.NET has the Object Data type. The Object data type can hold any type of data. It automatically adjusts its internal data type to accommodate the value so that it coule be stored.
Create a Variable in VB.NET
How to Create Variables in VB .NET
With Visual Basic .Net and most programming languages, what you are doing is storing things in the computer's memory, and manipulating this store. If you want to add two numbers together, you put the numbers into storage areas and "tell" Visual Basic to add them up. But you can't do this without variables. So a variable is a storage area of the computer's memory. Before using variable we have to declare that.
Variable Declaration
Syntax:
Dim <> As
Example
Dim a As Integer
Dim b As Integer
Dim c As Object
Dim str As String
Using Variable
a = 2
b = 4
Dim
Short for Dimension. It's a type of variable. You declare that you are setting up a variable with Dim Keyword.
a
This is a variable. In other words, our storage area. After the Dim word, Visual Basic is looking for the name of your variable.
As Integer
We are telling to Visual Basic that the variable is going to be a number (integer). The above example “a” is going to be a Integer.
VB NET Variables Example
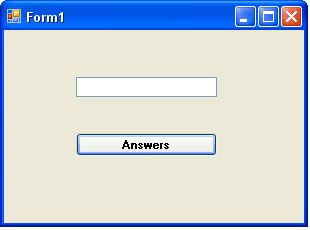
We have met two variable types so far - As String and As Integer. Put a textbox and a Button on your new form.
Change the Properties of the Textbox to the following
Name: txtNumbersText: just delete the default Textbox1, and leave the textbox blank
Change the Properties of the Button to the following:
Text: Answers
Your Form should look something like this:
Private Sub Button1_Click(ByVal sender As System.Object, _ByVal e As System.EventArgs) _Handles Button1.Click
Dim testNumber As IntegertestNumber = txtNumbers.TextMsgBox testNumber
End Sub
Notice that there is a new Type of variable declared - As Short. This means "Short Integer". We'll see what it does.
Run your programme. While it's running, do the following:
Enter the number 1 into the textbox, and click the Answers button
The number 1 should display in the Message Box
Add the number 2 to the textbox and click the Button
The number 12 should display in the Message Box
Add the number 3 to the textbox and click the Button
The number 123 should display in the Message Box
Keeping adding numbers one at a time, then clicking the button
How many numbers did you get in the textbox before the following error message was displayed? (Click Break to get rid of it.)
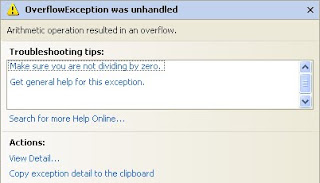
You should have been able to enter 12345 quite safely. When you entered 123456 and clicked the button, that's when the error message displayed.
When you click the Break button, you are returned to the coding environment. You'll see the problem line highlighted in yellow:
testNumber=val(txtNumber.Text)
But your programme will still be running. So click Debug > Stop Debugging to return to the normal code window.
An Overflow happens when you try to put too much information into a variable that can't handle it. The reason we got an error message after just 6 numbers was because of the variable type. We had this
Dim testNumber As Short
And it's As Short that is causing us the problems. If you use As Short you're only allowed numbers up to a certain value. The range for a Short variable is -32 768 to 32 767. When we entered 6 numbers, Visual Basic decided it didn't want to know. If you run your programme again, and then enter 32768, you'll get the same Overflow error message. If you change it once more to -32769, you'll get the error message as well. So it's not just 6 numbers a Short Type can't handle - it's 5 numbers above or below the values specified.
So what's the solution? Change the variable Type, of course!
Change the variable to this
Dim testNumber As Integer
Now start the programme and try again, adding numbers one at a time to the textbox, and then clicking the Command button. How far did you get this time?
If you started at 1 and added the numbers in sequence, you should have been allowed to enter 1234567890. One more number and Visual Basic gave you the Overflow error message, right? That's because variable types with As Integer also have a limitation. The range you can use with the As Integer variable type is -2,147,483,648 to 2,147,483,647. If you want a really, really big number you can use As Long.
Dim testNumber As Long
VB will chop off the point 45 bit at the end. If you want to work with floating point numbers (the .45 bit), there are three Types you can use:
Dim testNumber As SingleDim testNumber As DoubleDim testNumber As Decimal
Single and Double mean Single-Precision and Double-Precision numbers. If you want to do scientific calculations, and you need to be really precise, then use Double rather than Single: it's more accurate.
The As Decimal Type is useful when you want a Specific number of decimal places.
Monday, September 13, 2010
A Calculator Project in VB NET
In the next few pages, you're going to create a Calculator. It won't be a very sophisticated calculator, and the only thing it can do is add up. What the project will give you is more confidence in using variables, and shifting values from one control to another. So create a new project, call it Calculator, and let's get started. Designing the Form
Let's design the form first. What does a calculator need? Well numbers, for one. A display area for the result. A plus sign button, an equals sign button, and a clear the display button. Here's how our calculator is going to work. We'll have 10 button for the numbers 0 to 9. When a button is clicked its value will be transferred to a display area, which will be a Textbox. Once a number is transferred to the Textbox we can click on the Plus button. Then we need to click back on another number. To get the answer, we'll click on the equals sign. To clear the display, we'll have a Clear button.
If you haven't already, create a new project. Save it as Calculator. To your new form, first add ten Buttons (You can add one, then copy and paste the rest). The Buttons should have the following Properties:
Name: btn Plus a Number (btnOne, btnTwo, btnThree, etc)
Text: A number from 0 to 9. A different one for each button, obviously
Next, add a Textbox. Set the following properties for the Textbox:
Textbox Name: txtDisplayFont: MS Sans Serif, Bold, 14Text: Erase the default, Textbox1, and leave it blank
Three more Command buttons need to be added
Plus Button Name cmdPlusFont MS Sans Serif, Bold, 14Text +
Equals Button Name cmdEqualsFont MS Sans Serif, Bold, 14Text =
Clear ButtonName cmdClearFont MS Sans Serif, Bold, 14Text Clear
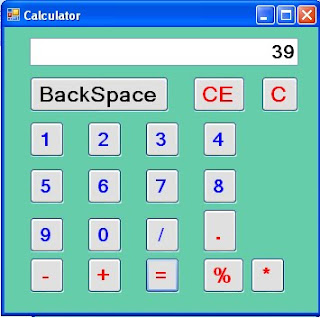
When your form design is finished, it might look something like this
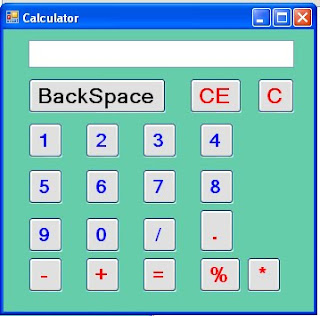
Calculator Project in VB.NET
Public Class Form1
Dim a As Double
Dim b As Double
Dim c As Double
Dim Opt As String
Private Sub Button1_Click(ByVal sender As System.Object, ByVal e As System.EventArgs) Handles Button1.Click
T1.Text += Button1.Text
End Sub
Private Sub Button2_Click(ByVal sender As System.Object, ByVal e As System.EventArgs) Handles Button2.Click
T1.Text += Button2.Text
End Sub
Private Sub Button4_Click(ByVal sender As System.Object, ByVal e As System.EventArgs) Handles Button4.Click
T1.Text += Button4.Text
End Sub
Private Sub Button3_Click(ByVal sender As System.Object, ByVal e As System.EventArgs) Handles Button3.Click
T1.Text += Button3.Text
End Sub
Private Sub Button6_Click(ByVal sender As System.Object, ByVal e As System.EventArgs) Handles Button6.Click
T1.Text += Button6.Text
End Sub
Private Sub Button5_Click(ByVal sender As System.Object, ByVal e As System.EventArgs) Handles Button5.Click
T1.Text += Button5.Text
End Sub
Private Sub Button10_Click(ByVal sender As System.Object, ByVal e As System.EventArgs) Handles Button10.Click
T1.Text += Button10.Text
End Sub
Private Sub Button9_Click(ByVal sender As System.Object, ByVal e As System.EventArgs) Handles Button9.Click
T1.Text += Button9.Text
End Sub
Private Sub Button8_Click(ByVal sender As System.Object, ByVal e As System.EventArgs) Handles Button8.Click
T1.Text += Button8.Text
End Sub
Private Sub Button7_Click(ByVal sender As System.Object, ByVal e As System.EventArgs) Handles Button7.Click
T1.Text += Button7.Text
End Sub
Private Sub Form1_Load(ByVal sender As System.Object, ByVal e As System.EventArgs) Handles MyBase.Load
End Sub
Private Sub EqualButt_Click(ByVal sender As System.Object, ByVal e As System.EventArgs) Handles EqualButt.Click
b = Val(T1.Text)
If Opt = "/" Then
T1.Text = a / b
ElseIf Opt = "+" Then
T1.Text = a + b
ElseIf Opt = "-" Then
T1.Text = a - b
ElseIf Opt = "*" Then
T1.Text = a * b
ElseIf Opt = "%" Then
T1.Text = a Mod b
End If
End Sub
Private Sub PlusButt_Click(ByVal sender As System.Object, ByVal e As System.EventArgs) Handles PlusButt.Click
a = Val(T1.Text)
Opt = PlusButt.Text
T1.Text = ""
End Sub
Private Sub MinusButt_Click(ByVal sender As System.Object, ByVal e As System.EventArgs) Handles MinusButt.Click
a = Val(T1.Text)
T1.Text = ""
Opt = MinusButt.Text
End Sub
Private Sub CEButt_Click(ByVal sender As System.Object, ByVal e As System.EventArgs) Handles CEButt.Click
T1.Text = " "
End Sub
Private Sub CButt_Click(ByVal sender As System.Object, ByVal e As System.EventArgs) Handles CButt.Click
T1.Text = " "
End Sub
Private Sub DivButt_Click(ByVal sender As System.Object, ByVal e As System.EventArgs) Handles DivButt.Click
a = Val(T1.Text)
T1.Text = ""
Opt = DivButt.Text
End Sub
Private Sub DotButt_Click(ByVal sender As System.Object, ByVal e As System.EventArgs) Handles DotButt.Click
T1.Text += DotButt.Text
End Sub
Private Sub ModButt_Click(ByVal sender As System.Object, ByVal e As System.EventArgs) Handles ModButt.Click
a = Val(T1.Text)
T1.Text = ""
Opt = ModButt.Text
End Sub
Private Sub StarButt_Click(ByVal sender As System.Object, ByVal e As System.EventArgs) Handles StarButt.Click
a = Val(T1.Text)
T1.Text = ""
Opt = StarButt.Text
End Sub
End Class
Tuesday, July 20, 2010
Assigning Textbox text to your Variables
TextBox1.Text = FullName
If you hold your cursor of the Textbox1, you'll see this:
TextBox1.Text = FullName
It's displaying this message because you changed the name of your Textbox1. You now no longer have a textbox with this name. In the code above, change Textbox1 into TxtFirstName and the wiggly lines will go away. (Change it in your Button1 code as well.) Your code should now read:
TxtFirstName.Text = FullName
Run your programme again. If you see any error messages, stop the programme and look for the wiggly lines in your code.
We'll now change our code slightly, and make use of the second textbox. You'll see how to get at the text that a user enters.
Locate these two lines of code
FirstName = "Hello"LastName = “World”
Change them to this
FirstName = TxtFirstName.TextLastName = TxtLastName.Text
Remember: the equals ( = ) sign assigns things: Whatever is on the right of the equals sign gets assigned to whatever is on the left. What we're doing now is assigning the text from the textboxes directly into the two variables.
Amend your code slightly so that the Whole Name is now displayed in a message box. Your code should now be this:
Dim FirstName As StringDim LastName As StringDim WholeName As String
FirstName = TxtFirstName.TextLastName = TxtLastName.Text
WholeName = FirstName & " " & LastName
MsgBox(WholeName)
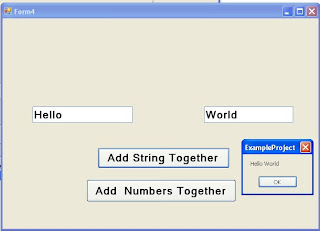
Run your programme. Enter “Hello” in the first textbox, and “World” in the second textbox. Then click your "String Test" button. You should get this:
FirstName = "Hello"
But what we really want to do is get a person's name directly from the textbox. This will make life a whole lot easier for us. After all, not everybody is called Bill Gates! In the line FirstName = TxtFirstName.Text that is what we're doing - getting the name directly from the textbox. What we're saying to Visual Basic is this
Look for a Textbox that has the Name TxtFirstName
Locate the Text property of the Textbox that has the Name TxtFirstName
Read whatever this Text property is
Put this Text property into the variable FirstName
And that's all there is too reading values from a textbox - just access its Text property, and then pop it into a variable.
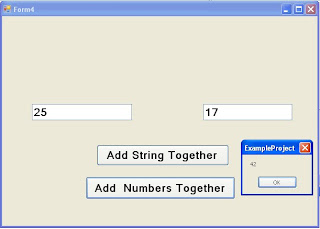
Total is now displayed in a message box. Your code should be this:
Dim FirstValue As Integer
Dim SecondValue As Integer
Dim Total As Integer
FirstValue = TxtFirstName.Text
SecondValue = TxtLastName.Text
Total = FirstValue + SecondValue
MsgBox(Total)
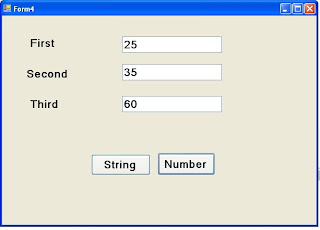
Exercise 1
Add a Three Textbox to your form
Change its Name property to each TextBoxl
Add Three Labels to your form identifying each textbox
Add Two Buttons to your form and Change Text Property “Numbers” and “String”
Write code when the “Number” Button is Clicked, the Total of the Two values is Displayed in your Third TextBox.
Write code when the "String" button is clicked, the whole of the String name is displayed in your Third TextBox.
When you complete this exercise, your form should look like this one
Adding Controls
Adding Controls Using the Toolbox
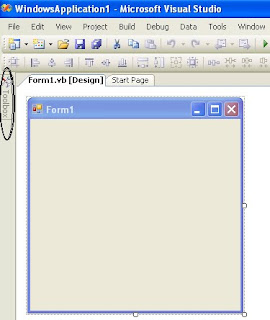
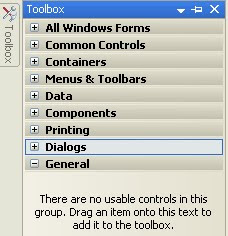
To display all the tools, move your mouse over the toolbox icon. You will see the following ToolBox:
There are seven categories of tools available in the Toolbox.
The toolbox you'll be working with first is the Common Controls. To see the tools, click on the plus symbol next to Common Controls. Long list of tools will be appear on the Screen:
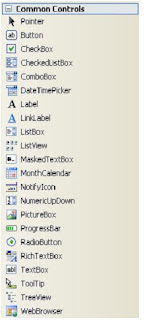
Friday, July 2, 2010
VB .NET Forms
Page : 1 2 3 4 5 6 7 8 9 10 11 12 13 14
Visual Basic .NET Forms
In the Visual Basic NET design time environment, the first thing to concentrate on is that strange, big square in the top left. That's called a form. It's actually the pretty bit of your programme, the part that others will see when they launch your masterpiece. Granted, it doesn't look too attractive at the moment, but you'll soon discover ways to lick it into shape.
To run the form, try following steps:
• Select From the menu bar, click Debug
• From the drop down menu, click Start
• Alternatively, press the F5 key on your keyboard
• Your programme is Started
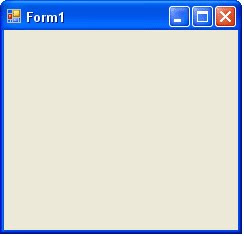
Visual Basic has two different environments
1. Design Environment
2. Debug Environment
Design Environment
Design Time is where you get to play about with the form, spruce it up, add Controls like Textboxes, Buttons, Labels and etc.
Debug Environment
Debug is where you can test your programme and see how well it performs. Or doesn't perform, as is usually the case.
Two step process to VB programming : designing and debugging.
Wednesday, June 30, 2010
Getting Started
Getting Started with VB .NET
Start your Visual Basic .NET or Visual Studio software. When the software first loads, you will see the screen something like this

At the bottom of the screen, there are two buttons: "Create Project" and "Open Project". To get started, click the "Create Project" button . The following dialogue box will be appear

As a beginner, you will normally want the option selected: "Windows Application", in the "Visual Basic Projects" folder. This means that you're going to be designing a programme to run on a computer running the Microsoft Windows operating system.
If you look in the Name textbox at the bottom, you will see it says "WindowsApplication1". This is the default name for your projects. It's not a good idea to keep this name. After all, you don't want all of your projects to be called "WindowsApplication1", "WindowsApplication2", etc. So click inside this textbox and change this Name to the following:
this Name to the following:
ExampleProject
Keep the Location the same as the default. This is a folder inside of your "My Documents" folder called "Visual Studio Projects". A new folder will then be created for you, and its name will be the one you typed in the "Name" textbox. All of your files for your first project are then saved in this folder.
Click the OK button, and the Visual Basic NET design time environment will open.
